Welcome friends! Today I designed a birthday card for
a good friend. This stamp set from Simon
is a large 6x8 set that was a part of the March 2019 stamp kit.

It was love at first site as I could see the
versatility of the stamp images. You can
use the images as shapes, as they are and create a variety of cards, both
masculine and feminine. Or, you can use
as florals and add hand-drawn stems. Or,
you can cut them out with various circle dies.
Or, you can use the images to design awesome background panels. In addition to the images, the sentiments are
very inspirational and uplifting.

My card today is a tall card, 4.25x9. Just a bit too wide to fit into a regular #10
envelope so I’ll have to make a custom envelope.
Step 1: I started by creating the top panel. I used Canson XL watercolor paper. Using three Distress Oxide inks (Abandoned Coral, Wild Honey, Dusty Concord) and a blending tool. I blended the three inks starting with the Wild Honey, next the Abandoned Coral, the Dusty Concord and then the Wild Honey again. After letting the panel dry, I treated the panel with my anti-static powder bag in preparation for heat embossing.
Step 1: I started by creating the top panel. I used Canson XL watercolor paper. Using three Distress Oxide inks (Abandoned Coral, Wild Honey, Dusty Concord) and a blending tool. I blended the three inks starting with the Wild Honey, next the Abandoned Coral, the Dusty Concord and then the Wild Honey again. After letting the panel dry, I treated the panel with my anti-static powder bag in preparation for heat embossing.
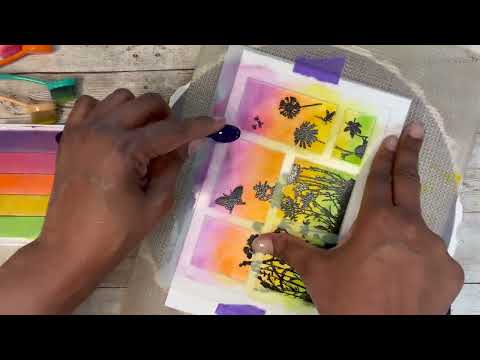
Step 2: I
selected six of the larger images from the stamp set, I applied VersaMark ink
individually and stamped them one by one in an intentional pattern, alternating
three embossing powders from Hero Arts (copper, gold, and silver).
Step 3: After heat embossing all, I used all of the images from the stamp set (except the solid circles) and stamped them onto the front panel using the three distress oxide inks. I covered the entire panel with the stamps not worrying if they overlapped a bit. I alternated the colors as I stamped to create interest and more dimension. Using my paper trimmer, I trimmed the panel to 3.75x8.75 (33/4x83/4).
Step 3: After heat embossing all, I used all of the images from the stamp set (except the solid circles) and stamped them onto the front panel using the three distress oxide inks. I covered the entire panel with the stamps not worrying if they overlapped a bit. I alternated the colors as I stamped to create interest and more dimension. Using my paper trimmer, I trimmed the panel to 3.75x8.75 (33/4x83/4).
Step 4: Using my
trimmer, I cut a second panel from purple cardstock and sized it at 4.25 x9. I adhered this, using double-sided tape, to
the 8.5 x 9 white, 110lb cardstock scored down the center and folded which was
the base of the card.
Step 5: I stamped my sentiment on matching
purple cardstock with VersaMark Clear Embossing Ink using a stamp from the Ranger LetterIt Birthday stamp
set. I applied anti-static powder
and used Brutus Monroe Alabaster White Embossing Powder and heat set the
sentiment. I trimmed the sentiment strip
down to 1.25 x4.25 inches wide so that it spans the entire width of the card
base.
Step 6: Using
double-sided tape, I adhered my designed panel to the purple panel and card
base, centering it.
Step 7: I used
double-sided tape to affix the sentiment strip to the top of the card design.
Step 8: On the
inside of the card, I stamped a sentiment from the Stampendous Birthday Stamp set. Using the three distress oxide inks, I
randomly stamped some of the images from the stamp set, added the Celebrate and Cheers sentiments from the
Ranger LetterIt stamp set.
Step 9: I
finished off the outside of the card by randomly adding Ranger Liquid Pearl
drops in gold and fuchsia.
The copper, gold, and silver embossed images on the front panel make
a shiny statement! Such texture! I love how this card design turned out. Hope it provides inspiration to you!
Thanks for stopping by. Good
day friends!
Rae


No comments:
Post a Comment