Hello and Welcome!
Today I’m featuring another 5x7 card featuring the February 2019 My Monthly Hero Arts Kit!
Today I’m featuring another 5x7 card featuring the February 2019 My Monthly Hero Arts Kit!
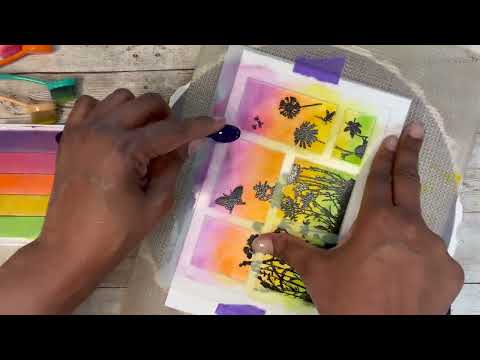
For the background, I started by stamping various items from
the kit on a 6x6 piece of cardstock using Gina K Amalgam Jet Black
ink. I placed my stamps in one triangle of the Concord & 9th Turnabout
Stamp jig and turned it four times to complete the background. I
then trimmed the background down to mount onto a 5x7 panel.

Next, I die cut a 5x7 stitched frame
from black cardstock as my panel using the Waffle Flower Lacy Layers Die
Set. Using Hero Arts White Unicorn Ink, I used a border stamp from
the set to create borders along all edges.


I couldn’t wait to use these
dancers! I stamped them with VersaFine Black Onyx ink and heat
embossed them with Wow Clear Embossing Powder. I colored their skin
with my alcohol markers. I colored the hair of the lady (couple)
with a brown alcohol marker. I cut out the couple and the two
individual dancers using the frame dies from the kit. Don’t they
look fun?

Next, I cut out a rectangle using my paper
trimmer. I die cut the left and right sides, using the same 5x7
frame die, so that the two sides have the same stitching as the blank frame
panel.
To finish the card, I mounted the background
panel on top of the black panel with the bordered sides using double-sided
tape. I stamped my sentiment with VersaMark Clear Embossing Ink
using a stamp from the kit. I applied Brutus Monroe Alabaster White
Embossing Powder and heat set the sentiment. I adhered my black panel
to a white, 7x10 cardstock that is scored and folded at the 5” mark to make my
folder 5x7 card base. After placing the sentiment over the
background stamp I lined it up on either side with the stitching on the black
border panel. Next, I used double-sided foam tape to add dimension to
my dancing couple and placed them to the left of the sentiment. I
placed my other couple beneath the sentiment using Simon Says Stamp Liquid Glue
and placed a stamp block on top for a few minutes to make sure they were
adhered and secured. Lastly, I placed lots of the black and gold art
deco confetti pieces throughout the background, using Simon Says Stamp Liquid
Glue, to add jazz and sparkle.
Thanks for stopping by.
Good day friends!
Rae


No comments:
Post a Comment