Sunday, March 31, 2019

Hero Arts: My Monthly Hero Arts March 2019 Kit – Card#2


Welcome friends! Today I’ve designed my second card featuring the kit.  The kit has sold out.


My card today is a tall, tri-fold card, 3.75x9.  I made sure this card fits nicely into a regular #10 envelope J.  Today’s card tells a story by creating a fun ocean scene.


Step 1: I used Canson XL watercolor paper and trimmed down the 9x12 panel to 9x11.25. 

Step 2: I taped together enough post-it notes to fit the width of the 11.25 wide panel.  Then I cut curves and valleys to make a mask to create the sand bottom of the sea. 

Step 3: Using my mask, I masked off the floor of the sea.  Next, I used the sea glass and blue water inks from the kit.  I applied them to the panel with blending tools.  I blended both colors to make my sea.  Afterwards, I spritzed some water across the panel to create texture and bubbles throughout the water. 

Step 4: I removed the mask and let the panel dry and applied my anti-static powder bag to the line dividing the water and my soon to be sea bottom.

Step 5: Then I created my sand floor.  Using the same mask, I turned it upward in the opposite direction and used VersaMark ink and took the pad directly to the panel and repeated all the way across making sure I got good coverage.  Next I liberally applied Hero Arts Sand Embossing Powder that came in a previous kit.  I let my heat tool get very hot and started by heating from the back of the panel before switching the heat to the front to finish the embossing of the sand.

Step 6: I scored the panel twice, once at the 3.75 mark and turned it to score it again at the 3.75 mark.  Next, I used my bone folder to fold each scored line creating the tri-fold.

Step 7:  I folded the panel and ran it through my die-cutting machine to flattened my panel as it got warped during the creation process.

Step 8: I stamped and die-cut many of the images from the kit to create my ‘bottom of the sea’ scene.  I stamped each image on various colored cardstock. 

Step 9:  I stamped my sentiment from the kit, “I would swim the seven seas to find you”, twice on the front panel using VersaFine Onyx black ink.

Step 10:  Using VersaFine Onyx black ink, I stamped the scuba diver directly on the panel, twice, once so s/he appears to be swimming down to the sea bottom and once so s/he appears to be swimming up towards the surface of the sea.

Step 11 : Next, I used my anti-static bag and VersaMark embossing ink to stamp the school of fish image from the kit, twice, and heat embossed it with Brutus Monroe White Alabaster Embossing Powder.

Step 12:  Now I’m ready to build my ocean scene.  I started by laying out all my images and repositioning them until I get them where I wanted them.  I glue them on with liquid adhesive and place a stamping block on each to secure it down.

Step 13:  I applied Nuvo White Blizzard Glitter Drops to all the sea life to add sparkle and shine.  You can see it much better in person versus the photo.

This card was fun to make.  Hope it provides inspiration to you!  I’ll be back soon with more cards using this kit.

Thanks for stopping by.  Good day friends!

Rae

Saturday, March 30, 2019

Hero Arts: My Monthly Hero Arts March 2019 Kit


Welcome friends! Today I’ve designed my first card featuring the kit.  The kit has sold out.


Let’s take a look at what’s in the kit.  It includes a large 6x8 stamp set, 27 coordinating frame dies, one large aquarium fancy die, 3 water reactive ink cubes (sea salt, sea glass, blue water) and blue and green acrylic droplets.


My card today is a tall card, 4.25x9.  Just a bit too wide to fit into a regular #10 envelope so I’ll have to make a custom envelope.  Next time, I’ll be sure to make the card small enough to fit into a #10 envelope.


Step 1: I started by creating the top panel.  I used Canson XL watercolor paper.  Using three of the Nuvo Shimmer Powders, Blue Blitz, Atlantis Burst Green, and Solar Flare Yellow/Gold).  I started by wetting the paper down with water from a spritz bottle.  Next I applied the blue and green shimmer powders and spritz water on top. 

Step 2: Next I held the paper up and slowly turned it so that all of the colors mixed.  I wanted more blue than green as I wanted to create a water scene.  I added a bit more blue shimmer powder in places so that the blue is concentrated in key areas throughout the design.  While still wet, I added just a hint of yellow shimmer powder and spritzed it with water.  I used a paintbrush to spread the powder in areas where it may have concentrated.  The end result, is striking!

Step 3: Once dry, I dusted the panel with anti-static powder and applied VersaMark ink to school of fish and the bubbles images from the kit.  I heat embossed both with the Brutus Monroe Alabaster White Embossing Powder and heat set them.  I then stamped the scuba figure using VersaFine Onyx Black ink.

Step 4:  On 80lb white Neenah white cardstock, I selected five of the images from the stamp set (octopus, turtle, stingray, and two fish).  I stamped the images with Hero Arts Mid-Tone Navy Ink.  I used the blue water reactive ink from the kit and applied it around the edges of each image to remove the white border.  Next, I die-cut the images.  I used Simon Says Stamp Liquid Glue to adhere these images to the front panel.  Using my paper trimmer, I trimmed the panel to 3.75x8.75 (33/4x83/4).

Step 5: Using my trimmer, I cut a second panel from black cardstock and sized it at 4.25 x9.  I adhered this, using double-sided tape, to the 8.5 x 9 white, 110lb cardstock scored down the center and folded which was the base of the card.

Step 6:  I stamped my sentiment on matching black cardstock with VersaMark Clear Embossing Ink using a sentiment from the kit.  I applied anti-static powder and used Brutus Monroe Alabaster White Embossing Powder and heat set the sentiment.  I die-cut the sentiment from a Gina Marie Designs nested die set. 

Step 7: I cut a piece of the turquoise ribbon that the kit was wrapped in so that it overlapped the card panel.  I applied double-sided tape to the back of the ribbon and affixed it towards the top of the front panel and wrapped it around each side.  Using liquid glue, I centered the sentiment on top of the ribbon and placed it flush left on top of the panel.

Step 8:  I adhered my designed panel to the black panel and card base, using double-sided tape, centering it.  

Step 9:  To finish off my card, I used five of the random-sized green and blue acrylic droplets to add texture and interest. 

Love how this card turned out.  Hope it provides inspiration to you!  This is such a fun kit!  I’ll be back soon with more cards.

Thanks for stopping by.  Good day friends!

Rae

Friday, March 29, 2019

Simon Says Stamp ~ Birthday Card ~Amazing Stamp Set


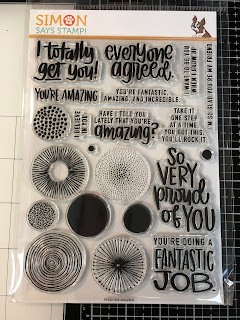
Welcome friends! Today I designed a birthday card for a good friend.  This stamp set from Simon is a large 6x8 set that was a part of the March 2019 stamp kit.  


It was love at first site as I could see the versatility of the stamp images.  You can use the images as shapes, as they are and create a variety of cards, both masculine and feminine.  Or, you can use as florals and add hand-drawn stems.  Or, you can cut them out with various circle dies.  Or, you can use the images to design awesome background panels.  In addition to the images, the sentiments are very inspirational and uplifting.

My card today is a tall card, 4.25x9.  Just a bit too wide to fit into a regular #10 envelope so I’ll have to make a custom envelope.

Step 1: I started by creating the top panel.  I used Canson XL watercolor paper.  Using three Distress Oxide inks (Abandoned Coral, Wild Honey, Dusty Concord) and a blending tool.  I blended the three inks starting with the Wild Honey, next the Abandoned Coral, the Dusty Concord and then the Wild Honey again.  After letting the panel dry, I treated the panel with my anti-static powder bag in preparation for heat embossing.

Step 2: I selected six of the larger images from the stamp set, I applied VersaMark ink individually and stamped them one by one in an intentional pattern, alternating three embossing powders from Hero Arts (copper, gold, and silver).  

Step 3:
After heat embossing all, I used all of the images from the stamp set (except the solid circles) and stamped them onto the front panel using the three distress oxide inks.  I covered the entire panel with the stamps not worrying if they overlapped a bit.  I alternated the colors as I stamped to create interest and more dimension.  Using my paper trimmer, I trimmed the panel to 3.75x8.75 (33/4x83/4).

Step 4: Using my trimmer, I cut a second panel from purple cardstock and sized it at 4.25 x9.  I adhered this, using double-sided tape, to the 8.5 x 9 white, 110lb cardstock scored down the center and folded which was the base of the card.

Step 5: I stamped my sentiment on matching purple cardstock with VersaMark Clear Embossing Ink using a stamp from the Ranger LetterIt Birthday stamp set.  I applied anti-static powder and used Brutus Monroe Alabaster White Embossing Powder and heat set the sentiment.  I trimmed the sentiment strip down to 1.25 x4.25 inches wide so that it spans the entire width of the card base.

Step 6: Using double-sided tape, I adhered my designed panel to the purple panel and card base, centering it. 

Step 7: I used double-sided tape to affix the sentiment strip to the top of the card design.

Step 8: On the inside of the card, I stamped a sentiment from the Stampendous Birthday Stamp set.  Using the three distress oxide inks, I randomly stamped some of the images from the stamp set, added the Celebrate and Cheers sentiments from the Ranger LetterIt stamp set.

Step 9: I finished off the outside of the card by randomly adding Ranger Liquid Pearl drops in gold and fuchsia. 

The copper, gold, and silver embossed images on the front panel make a shiny statement!  Such texture!  I love how this card design turned out.  Hope it provides inspiration to you!

Thanks for stopping by.  Good day friends!

Rae

Thursday, March 28, 2019

Hero Arts: Monthly Card Kit, Card #3 ~ February 2019


Hello and Welcome!

Today I’m featuring another 5x7 card featuring the February 2019 My Monthly Hero Arts Kit!
For the background, I started by stamping various items from the kit on a 6x6 piece of cardstock using Gina K Amalgam Jet Black ink.  I placed my stamps in one triangle of the Concord & 9th Turnabout Stamp jig and turned it four times to complete the background.  I then trimmed the background down to mount onto a 5x7 panel.


Next, I die cut a 5x7 stitched frame from black cardstock as my panel using the Waffle Flower Lacy Layers Die Set.  Using Hero Arts White Unicorn Ink, I used a border stamp from the set to create borders along all edges.

I couldn’t wait to use these dancers!  I stamped them with VersaFine Black Onyx ink and heat embossed them with Wow Clear Embossing Powder.  I colored their skin with my alcohol markers.  I colored the hair of the lady (couple) with a brown alcohol marker.  I cut out the couple and the two individual dancers using the frame dies from the kit.  Don’t they look fun?


Next, I cut out a rectangle using my paper trimmer.  I die cut the left and right sides, using the same 5x7 frame die, so that the two sides have the same stitching as the blank frame panel.

To finish the card, I mounted the background panel on top of the black panel with the bordered sides using double-sided tape.  I stamped my sentiment with VersaMark Clear Embossing Ink using a stamp from the kit.  I applied Brutus Monroe Alabaster White Embossing Powder and heat set the sentiment.  I adhered my black panel to a white, 7x10 cardstock that is scored and folded at the 5” mark to make my folder 5x7 card base.  After placing the sentiment over the background stamp I lined it up on either side with the stitching on the black border panel.  Next, I used double-sided foam tape to add dimension to my dancing couple and placed them to the left of the sentiment.  I placed my other couple beneath the sentiment using Simon Says Stamp Liquid Glue and placed a stamp block on top for a few minutes to make sure they were adhered and secured.  Lastly, I placed lots of the black and gold art deco confetti pieces throughout the background, using Simon Says Stamp Liquid Glue, to add jazz and sparkle.  

Thanks for stopping by.

Good day friends!


Rae
Tuesday, March 19, 2019

Hero Arts: Monthly Card Kit, Card #2 ~ February 2019

Welcome! Today I’m featuring a second card made with the February My Monthly Hero Arts Kit.  


For the background, I started with lilac/purple card stock cut with a 5x7 frame die using the Waffle Flower Lacy Layers Die Set. I used Hero Arts mid-tone navy ink and blended it onto the card stock. Next, I sprayed the panel all over with sheer shimmer spritz and let that dry. Once dry, I used the fancy frame die from the kit and cut it out. I also cut the frame out of the shiny silver/black card stock that came with the kit and out of black card stock. I pieced all back together alternating between the shiny silver/black card stock and the black card stock. Next, I stamped the sentiment from the kit using VersaFine black onyx ink and heat set it with clear embossing powder.


I'm having so much fun creating cards with this kit! Thanks for stopping by.

Good day friends!


Rae

Monday, March 18, 2019

Hero Arts: My Monthly Hero Arts Kit~ February 2019


Hero Arts: My Monthly Hero Arts Kit~ February 2019

Welcome! Today I’m featuring a card made with the February My Monthly Hero Arts Kit.  The kit’s theme is 1920’s  Swinging Jazz & Art Deco. Let’s jump right in and start playing with this fabulous, fun kit!  Today I’m making a 5x7, A7 card.


For the background, I started with black card stock cut with a 5x7 frame die using the Waffle Flower Lacy Layers Die Set.  I treated the panel with my anti-static powder bag.  Using the stencil from the kit, I applied VersaMark ink and Hero Arts Gold Embossing Powder and heat embossed the panel.  Next I stamped the sentiment with VersaMark ink and used the Hero Arts Black Embossing Powder.  I used a set of nesting oval dies from my stash.  I die-cut the largest from black card stock, the second largest from the gold card stock that came in the kit.  Next I used a smaller oval from black card stock and heat embossed the dancing couple from the kit using gold embossing powder.


I glued all of the oval frames together, from largest to smallest, and adhered them to the stenciled panel.  I added some of the black confetti from the kit to give the card more pizzazz.  Look at the shiny texture this card has.  The overall theme is so jazzy.  Love the way it turned out.  Hope it provides inspiration to you!

Thanks for stopping by. Good day friends!

Rae


Splashing Fun Water Technique | 4 Cards | #RTQ | Card Crafter’s Collaborative (3C), Summer Sizzle

Welcome Friends! Use background stamps, stencils, ink, and drops of water to create beautiful cards. Yes, water and inks make a big splash o...

Trending Now