Welcome Mates! I'm back today with three more slimline cards using the My Monthly Hero Arts Kit for April 2020. This kit sold out quickly.

Please check out the video using the link above or here.
Card 3: Has a Rainbow
& Birthday Theme - Hoppy Birthday to Roo
 I created a rainbow-colored panel using distress
oxide inks: festive berries, ripe persimmon, fossilized amber, mowed lawn,
blueprint sketch, seedless preserves, dusty concord, and chipped sapphire. I
spritzed a little water on the panel to activate the ink to soften the color
blend. Centered and repeat-stamped the Hoppy Birthday to Roo sentiment on the
panel using the HA Intense black ink from the kit. Starting at the top I moved
the cardstock down every 3/4ths of an inch and stamped until I reached the end.
I cut a piece of 40lb Bazzill vellum to 4¼” wide by 8½” tall. I scored the
vellum on the left side at ½” and folded and creased it. I placed my panel
inside the vellum, face up and glued the back flap of the vellum to the
backside of the panel. Next, I die cut the kangaroo from black cardstock and 5
balloons using the Sunny Studio balloon die using 3 different cardstock colors
to form a balloon bouquet. I added colored twine to the base of the balloons to
form balloon strings. Before affixing my kangaroo to the vellum layer of my
panel I fashioned the balloon strings so that it appears that my kangaroo is
holding the bouquet. I placed an acrylic block over it to let it dry a bit.
Next, I trimmed the ends the balloon bouquet strings and added my finished
panel to a 7½” x 8½” side folded card base.
I created a rainbow-colored panel using distress
oxide inks: festive berries, ripe persimmon, fossilized amber, mowed lawn,
blueprint sketch, seedless preserves, dusty concord, and chipped sapphire. I
spritzed a little water on the panel to activate the ink to soften the color
blend. Centered and repeat-stamped the Hoppy Birthday to Roo sentiment on the
panel using the HA Intense black ink from the kit. Starting at the top I moved
the cardstock down every 3/4ths of an inch and stamped until I reached the end.
I cut a piece of 40lb Bazzill vellum to 4¼” wide by 8½” tall. I scored the
vellum on the left side at ½” and folded and creased it. I placed my panel
inside the vellum, face up and glued the back flap of the vellum to the
backside of the panel. Next, I die cut the kangaroo from black cardstock and 5
balloons using the Sunny Studio balloon die using 3 different cardstock colors
to form a balloon bouquet. I added colored twine to the base of the balloons to
form balloon strings. Before affixing my kangaroo to the vellum layer of my
panel I fashioned the balloon strings so that it appears that my kangaroo is
holding the bouquet. I placed an acrylic block over it to let it dry a bit.
Next, I trimmed the ends the balloon bouquet strings and added my finished
panel to a 7½” x 8½” side folded card base.
Card 4: Shark Fest -
G’DAY MATE
 Features the background stencil from the kit. I
started with 80# Neenah white cardstock cut at 3½” x 8¼”. I inked and blended ocean
waves using salty ocean distress oxide ink and the bottom half of the stencil. I
used the My Favorite Things mini cloud stencil along with tumbled glass distress
oxide ink to create the clouds. Using the Hero Arts intense black ink from the
kit, I stamped the mountains using a stamp from a previous Hero Arts kit. From
that same kit I die-cut the smaller mountain to layer on top of the stamped
mountain. I applied antistatic powder to a scrap of cardstock and used
VersaFine onyx black pigment ink and clear embossing powder to heat emboss my
sentiment. I stamped the birds using a stamp from a prior Hero Arts kit using
the intense black ink. While the panel was drying I die-cut both the great
white shark and the reef shark from the kit twice. I affixed the shark die-cuts
to the panel “in the blue ocean area” with craft tacky glue and added the card
panel to a black, 110lb, 7½” x 8½” side folded card base. This left a black border around the finished
card.
Features the background stencil from the kit. I
started with 80# Neenah white cardstock cut at 3½” x 8¼”. I inked and blended ocean
waves using salty ocean distress oxide ink and the bottom half of the stencil. I
used the My Favorite Things mini cloud stencil along with tumbled glass distress
oxide ink to create the clouds. Using the Hero Arts intense black ink from the
kit, I stamped the mountains using a stamp from a previous Hero Arts kit. From
that same kit I die-cut the smaller mountain to layer on top of the stamped
mountain. I applied antistatic powder to a scrap of cardstock and used
VersaFine onyx black pigment ink and clear embossing powder to heat emboss my
sentiment. I stamped the birds using a stamp from a prior Hero Arts kit using
the intense black ink. While the panel was drying I die-cut both the great
white shark and the reef shark from the kit twice. I affixed the shark die-cuts
to the panel “in the blue ocean area” with craft tacky glue and added the card
panel to a black, 110lb, 7½” x 8½” side folded card base. This left a black border around the finished
card.
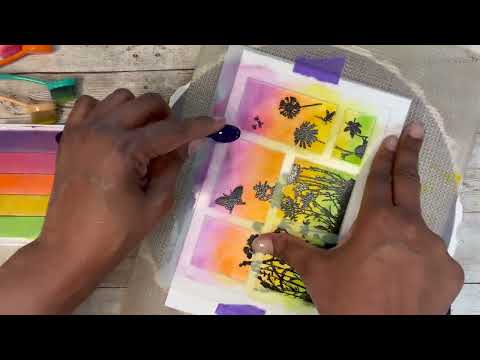
Card 5: BEAUT ~ Aussie
You Soon - G’DAY MATE
 Features the beautiful, Hero Arts Tropical
Foliage Bold Prints background stamp. I started with a black slimline panel
measuring 3¾” x 8½”. Using Hero Arts unicorn white pigment ink I stamped the
background stamp and set the panel aside to dry. I taped three progressive-sized
Scrapbook.com square dies together to form my design. I used three different
size squares 1½, 2, and 2½ inches. I layer my black panel with a white piece of
Neenah cardstock about the same size and die-cut the design. I started first
designing the smallest white square. I used the stencil from the kit to color a
little piece of sky and the sun portion of the stencil. I used dusty concord
and fossilized amber distress oxide inks to blend a small portion of the sky.
After the panel dried I heat embossed the sentiment “BEAUT” on the square.
Next, on the middle square I blended the dusty concord and fossilized amber distress
oxide inks to form more sky. Then, using the intense black ink and a branch
stamp from a past kit, I stamped the branch of leaves and the cockatoo. Moving
to the last, larger square, I used mowed lawn distress oxide ink to stamp the palm
tree from the kit. I used dusty concord distress oxide ink and blended with chipped
sapphire distress oxide ink to continue the skyline. Using vintage photo distress
oxide ink I colored the ground brown. I stamped the dingo using intense black
ink. Using craft tacky glue I affixed the black die-cut squares behind the
colored and stamped squares and trimmed about 1/8th” off the sides
of each square. I affixed the black panel to a black, 110lb, 7½” x 8½” side
folded card base.
Features the beautiful, Hero Arts Tropical
Foliage Bold Prints background stamp. I started with a black slimline panel
measuring 3¾” x 8½”. Using Hero Arts unicorn white pigment ink I stamped the
background stamp and set the panel aside to dry. I taped three progressive-sized
Scrapbook.com square dies together to form my design. I used three different
size squares 1½, 2, and 2½ inches. I layer my black panel with a white piece of
Neenah cardstock about the same size and die-cut the design. I started first
designing the smallest white square. I used the stencil from the kit to color a
little piece of sky and the sun portion of the stencil. I used dusty concord
and fossilized amber distress oxide inks to blend a small portion of the sky.
After the panel dried I heat embossed the sentiment “BEAUT” on the square.
Next, on the middle square I blended the dusty concord and fossilized amber distress
oxide inks to form more sky. Then, using the intense black ink and a branch
stamp from a past kit, I stamped the branch of leaves and the cockatoo. Moving
to the last, larger square, I used mowed lawn distress oxide ink to stamp the palm
tree from the kit. I used dusty concord distress oxide ink and blended with chipped
sapphire distress oxide ink to continue the skyline. Using vintage photo distress
oxide ink I colored the ground brown. I stamped the dingo using intense black
ink. Using craft tacky glue I affixed the black die-cut squares behind the
colored and stamped squares and trimmed about 1/8th” off the sides
of each square. I affixed the black panel to a black, 110lb, 7½” x 8½” side
folded card base.
The finished cards
measures 3¾”x 8½ “and fit into a standard #9 business envelope or create your
own matching envelopes using my DIY Slimline Card Envelope tutorial! Also, if
you missed Part 1 of this series please check out that video. I’ll link both
videos below.
***Link to my DIY Slimline Card Envelope Tutorial
Hero Arts: https://heroarts.com/pages/mmh-april-2020-kit
Sunny Studio Birthday Balloon Die: https://sunnystudiostamps.com/products/birthday-balloon-die?_pos=1&_sid=efac3cc5c&_ss=r
Scrapbook.com Nested Squares Die Set: https://www.scrapbook.com/store/uc-die-22801.html
Rae


No comments:
Post a Comment